Download and import Kali-attacker-2020 vm
0. Disclaimer
The instructor(s) are not responsible for any loss, incidental or consequential damage, or loss arising out of installation, use (unauthorized or otherwise), errors, mistakes, accident, theft or fraud, destruction, or any part of the provision of services.
If you have questions, consult a lawyer.
1. Download the Kali-Attacker VM
First, make sure you have VirtualBox installed. Then, download the following Kali-Attacker-2020 VM (.ova) which we will refer to as the attacker machine.
Size: 8,011,500,544 bytes (~8.01 GB)
Kali-Attacker-2020.ova md5 checksum: adbd3bf688630c080b426e698cd4c30f
Kali-Attacker-2020.ova sha1 checksum: 793d851e0833f7220bba1045bc19162f306fbace
Kali-Attacker-2020.ova sha256 checksum: 9f00e50cb6e3b5127efb2cb8b40caa14269dad4b96b0ceb1e568180ba0b66cc5
Alternative download link(s): [Google Drive] [MyCloud]
2. Import the Kali-Attacker-2020 VM to VirtualBox
Note: The following directions were made on a Mac OS. If you have another operating system, it should be easy to relate to the directions below.
-
Make sure you have at least 25GB free disk space on you laptop
-
Start (open) VirtualBox
-
Click "File"
-
Click "Import Appliance"
-
Navigate to where you downloaded the "Kali-Attacker-2020.ova" file
-
Choose it and click "Open"
-
In the "MAC Address Policy" dropbox, choose "Generate new MAC addresses for all network adapters"
-
Click the "Import" button and wait until the VM is fully imported in your VirtualBox Manager window
-
Right-click the imported VM and click "Settings"
-
Go to the "Network" settings and make sure that
-
Adapter 1 is attached to "NAT"
-
-
Click "Ok"
-
Start the VM and wait until you see the login screen
-
Login using username "root" and password "toor"
Congratulations! You are ready.


3. Take a Snapshot
A snapshot is a way to preserve the state and data of a virtual machine at a specific point in time. In case the VM gets corrupted for any reason, you can restore the VM to the snapshot (clean state) without the need to re-download or re-import the VM.
It is highly recommended to take a snapshot of the VM as soon as you make sure it is in working condition (and before you start customizing or using it). To take a snapshot of the VM (using VirtualBox):
1. Choose the Kali-Attacker-2020 VM
2. Click the "Three Item List" icon on the right side of the VM
3. Choose "Snapshot"
4. Click "Take"
5. Give your snapshot a name (or leave it as it is) then click "Ok"
6. You can now see the new snapshot in the following window.
7. In the future, if your VM gets corrupted for any reason you can (a) get back to the above window, (b) choose the snapshot you want to restore, and (c) click "Restore".


4. Troubleshooting
If you receive the following error message:
make sure that you have at least 25GB available hard drive disk space on your computer.

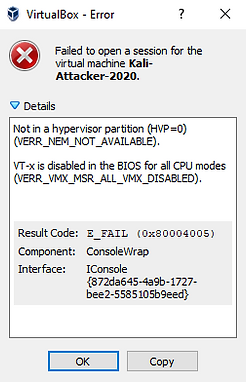
If you receive the following error message:
make sure to ENABLE VIRTUALIZATION on your laptop/computer BIOS.
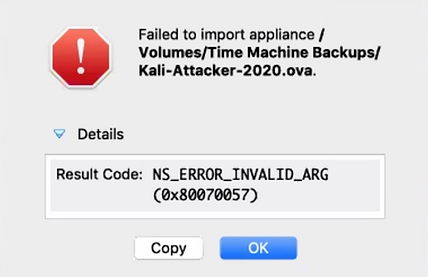
If you receive the following error message:
then most probably the OVA file you downloaded got corrupted somehow. Check the md5 of the downloaded file and compare it with the md5 value at the top of this page. If the values do NOT match, delete the file you have and download the OVA file again. If the values match, contact the instructor.
On Mac OS, if the VM was imported successfully but when you try to start it you receive the following error message(s):
then most probably VirtualBox does NOT have permission to run on your Mac OS for some reason. You should:
- download the VirtualBox installer again
- click on "Uninstall VirtualBox" and follow the steps carefully until you receive a message that the process was completed
- click on "VirtualBox Install" to install a fresh copy of VirtualBox
- open "Security & Privacy" from your Mac's System Preferences and make sure to click "Allow" when prompted with the message below:
Once VirtualBox is successfully installed, you should open it and find that the VM you imported is still there. Start it and you should be good to go.


