Hacking WEP and wpa2
wifi access points
workshop
Disclaimer
The instructor(s) are not responsible for any loss, incidental or consequential damage, or loss arising out of installation, use (unauthorized or otherwise), errors, mistakes, accident, theft or fraud, destruction, or any part of the provision of services.
If you have questions, consult a lawyer.
0. Environment Setup (before the workshop - on your laptop)
This workshop page is intended to be used in an interactive environment where the instructor is available. In case you have questions, feel free to contact the instructor.
To perform the activities in this workshop, you will need to:
-
Bring your own laptop with at least 25GB disk space and an available USB port
-
Install VirtualBox (download)
-
Download and import the Kali-Attacker-2020 VM (.ova) into your VirtualBox (directions can be found here)
-
Checkout a Panda PAU07 WiFi USB adapter from the instructor (and return it before you leave)
If you are having trouble attaching the WiFi USB adapter to the Kali VM, visit this Troubleshooting Knowledge Base.
1. Revisiting Workshop Ad
With the modern widespread use of WiFi, it is important to show students how WiFi access points can be exploited in practice. The theory behind exploiting WEP and WPA2 has been available for a number of years. However, it has not been easy to offer students the opportunity to apply these theories in a real environment. In this workshop, you will (1) learn how to locate and identify WiFi access points (a.k.a reconnaissance), (2) understand the conditions under which WEP and WPA2 can be hacked, and (3) and get a chance to checkout a WiFi USB adapter and hack up to four WEP access points (with different settings), in addition to a WPA2 access point.
2. Objectives
- Practice WiFi scanning and reconnaissance
- Identify WiFi access point location, bssid, channel, and vendor
- Exploit WEP access points with connected clients
- Exploit WEP access points with different key sizes (64-bit and 128-bit)
- Exploit WPA2 access points (given a wordlist)*
- Exploit WEP access points with NO connected clients
* I hope you have noticed that we will go over exploiting WPA2 before "WEP with NO connected clients". This is because the latter requires a lot of time and has some limitations. Thus, it is preferred to make sure you get to practice exploiting WPA2 (given a wordlist) first before you spend the rest of the workshop trying to exploit the WEP access point which has no connected clients. We will discuss the differences during the workshop.
3. Getting Started with WiFi Scanning and Reconnaissance
In the terminal, type the following command:
airmon-ng
to view available adapters. You should get an output that looks like this:

To turn the wlan0 interface into monitor mode, type the following command:
airmon-ng start wlan0
and wait until you receive a message that looks like this:

Notice that the name of the interface has now changed from wlan0 to wlan0mon.
To start scanning for WiFi networks, type the following command:
airodump-ng wlan0mon
and you should start seeing the networks around you that look like this:

Now, assume you want to just see the information for an access point which you have its name, you can use the following command:
airodump-ng --essid $AP_NAME wlan0mon
where the $AP_NAME is the name of the access point you want to focus on.
Example: If the access point was called cs4760, the following would be:
airodump-ng --essid cs4760 wlan0mon
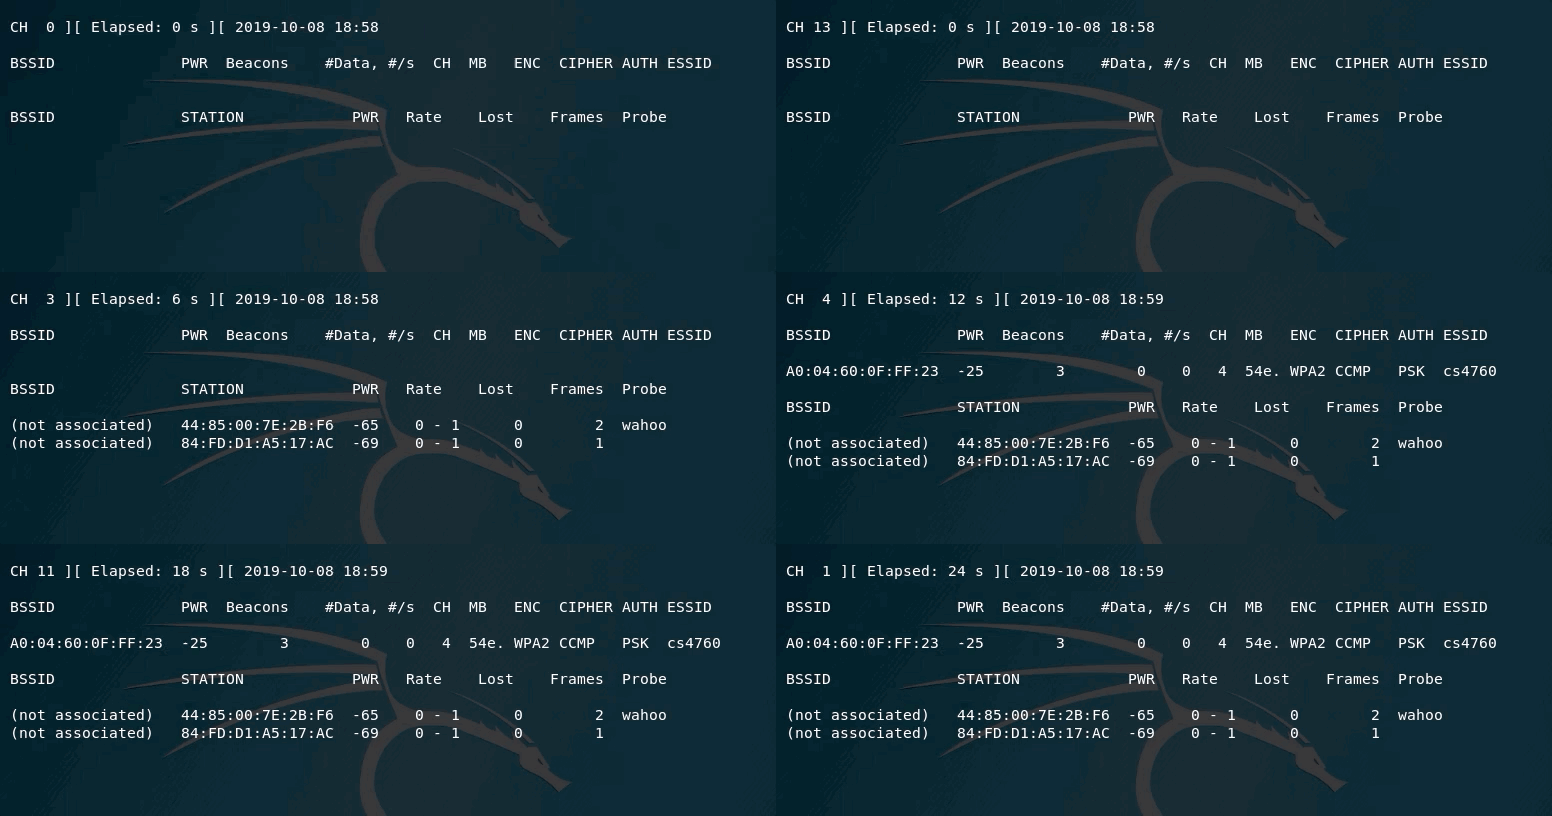
and you should start seeing an output that looks like this:

In the above example, you can see that the cs4760 does NOT show up until channel 4 was scanned. Also, you can see that the scanning is hopping over multiple channels (1, 7, 13, 2, ...). That is called "channel hopping". It means that your adapter is moving between channels to do its scanning. However, after you know what channel the WiFi access point is on, you need to scan only THAT channel.
Now, assume you want to just see the information for an access point which you have its name, you can use the following command:
airodump-ng --essid $AP_NAME -c $CHANNEL wlan0mon
where the $AP_NAME is the name of the access point you want to focus on and the $CHANNEL is the only channel you want to scan.
Example: If the access point was called cs4760 and the channel was 4, the command should be:
airodump-ng --essid cs4760 -c 4 wlan0mon
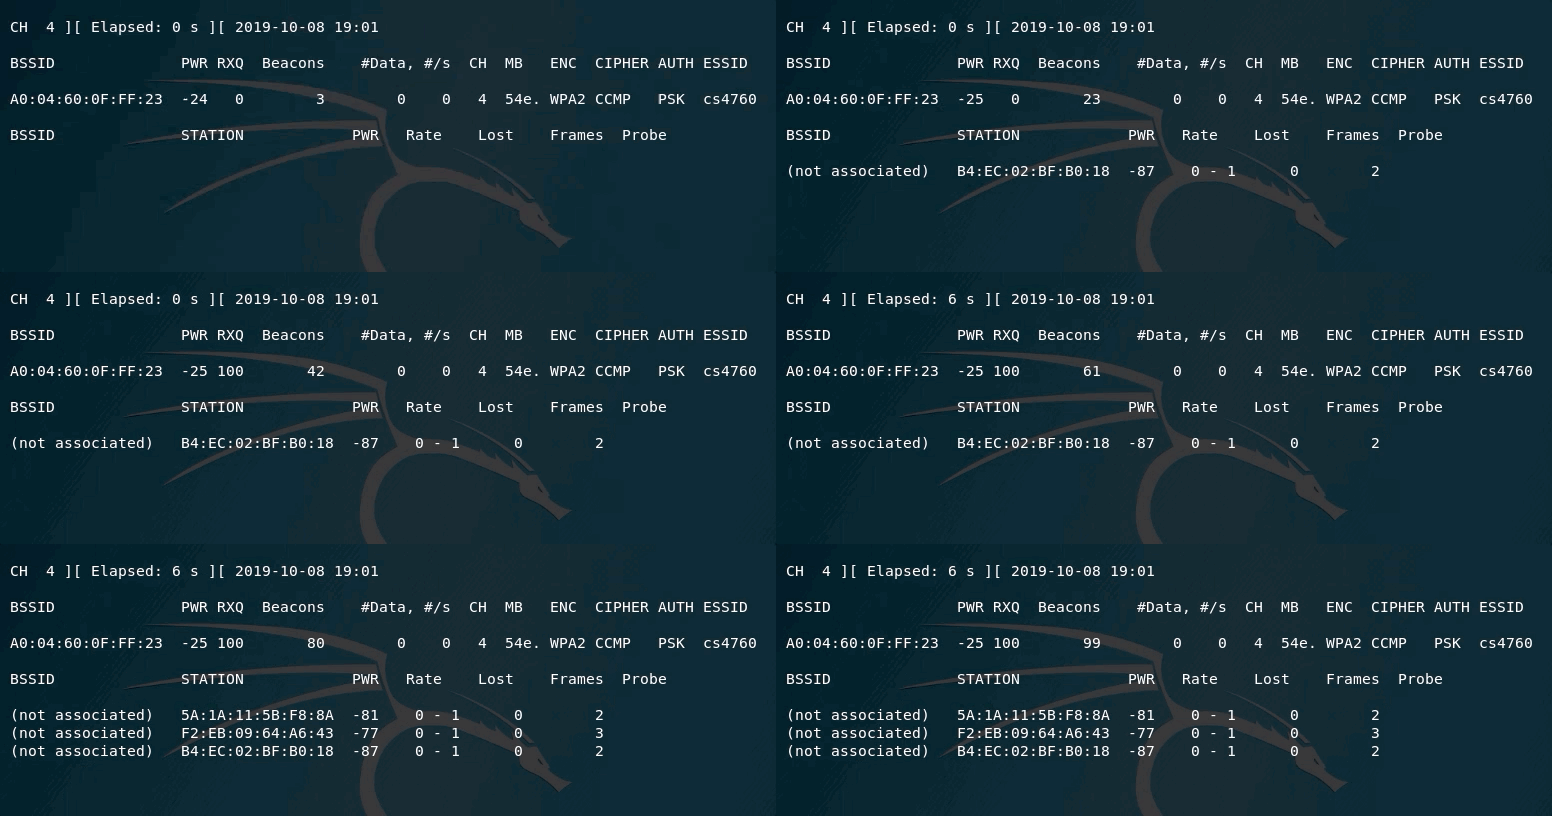
and you should start seeing an output that looks like this:

In the above example, you can see that the channel being scanned is fixed (channel 4). This means, that you will not lose any packets being transmitted on this channel for this access point.
One other important element in the output is the PWR. It tells you how far/close are from the access point. The closer it gets to 0, the closer you are to the access point.
4. Reconnaissance
A small WiFi device is hidden on this floor. Its name is FINDME. Where is it?
Find the following:
- FINDME bssid
- FINDME Channel
- FINDME Encryption
- FINDME Location
Write the answers on the handout or register on this CTF to check you've got the correct answers.